Your Guide to DIY Outboard Motor Inspection and Maintenance
Outboard motors are still the most popular type of boat engines out there. Their reliability and power to fish in the deep waters, namely the ocean and lakes, is undeniable. But, with great freedom comes great responsibility.
Whether you’re riding with a 2-cylinder or a V-8 outboard motor, these engines are put through a lot of abuse. It is your job to keep it humming the same tune as when you first got it. We’ve put together a checklist of sorts to help you cover all the various maintenance areas and make sure you don’t run into any boat problems.
This guide will only cover outboard motors, not Sterndrive hybrids. You will, of course, find many similarities. All these chores require is a little patience and diligence, and you’ll be rewarded with many more years of quality service.
Keep on reading to learn more.
Flushing Out the Salt
This step is going to require a bit of research on your outboard motor. You will need to check your owner’s manual to find out how you need to go about flushing the motor. Some motors are best flushed using a muff device, while others should be flushed through the designated port.
If you’re flushing through the motor’s designated port, it must be turned off. This is because water doesn’t move through the water pump, so you could cause damage to the pump impeller if left on.
Using a muff device is often recommended because it creates more pressure, flushing salt out the lines better. The engine would be left on neutral and can be fully flushed out in only 15 minutes.
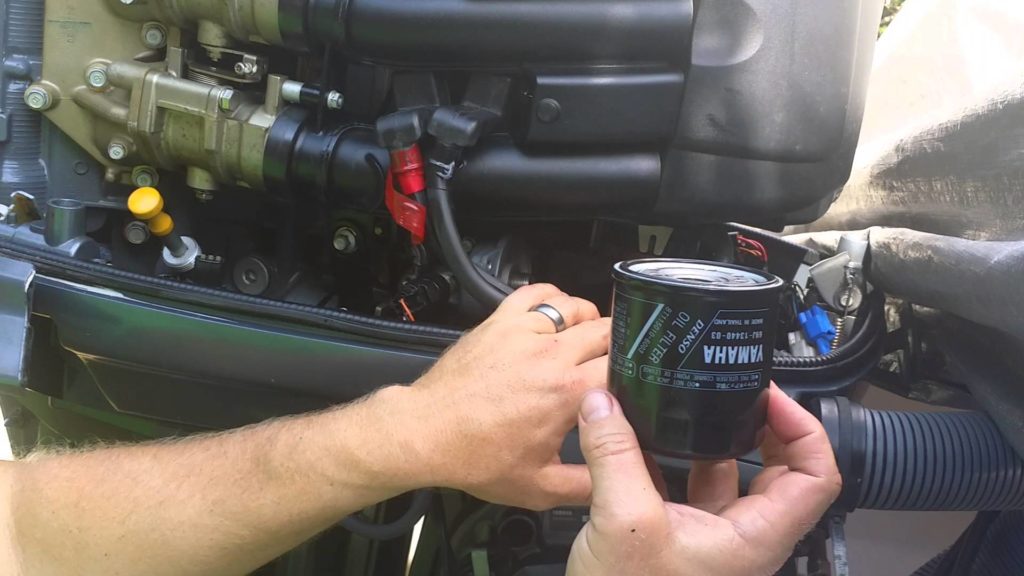
Changing the Oil
This is an essential step for four-stroke motors, but unnecessary for two-stroke outboard motors. Commercial fishing boats will definitely need to change the oil regularly in their outboard motors. A general rule of thumb would be every season or 100 hours of use, whichever comes first.
This oil change would also accompany an oil filter change, too. This process is made much easier when following your regular water flush. While the engine is still warm, take it out of the water and proceed to the next step.
Unplug the oil drain and let it flow out into a drain pan. Then, proceed to remove the old oil filter by hand and replace it with the new one. Put the drain plug back in and let the engine run for a minute or two to get the new oil coated.
Not Just Any Oil
As for the brand of oil, this will depend on the make and model of your outboard motor. You’ll probably get different answers from different boat owners. Sometimes manufacturers will state use of synthetic-only oil.
While shopping around, make sure your oil is rated FC-W. This oil is specially rated for outboard motor use by the National Marine Manufacturers Association. It has compounds in it to guard against corrosion and improve engine performance in marine applications.
Take note of what your outboard motor’s oil capacity is, so you’re not over or under filling the crankcase. Too much oil and you might break seals in the lines and gunk up the entry point. Too little just means you’ll be replacing your oil sooner next time, not quite as damaging if you’re vigilant.
Changing the Gear Oil
Next up is the gear oil, also known as gear lube, which is often overlooked by new boaters. This important fluid helps prevent water from leaking into the gear case. It’s usually a good idea to change it along with your oil, so you don’t forget.
You’ll find gear oil in the same aisle in most auto part stores. Look for oil made for outboard motors. If you can’t find gear oil for marine motors, it must meet or exceed GL-5 rating.
Marine gear oil is superior as it resists foaming if water leaks in. Marine grade gear oil keeps water in suspension and still lubricates the motor. Non-marine automotive grade oils can foam, and thus not keep the water in suspension, so the gears can be running in water with no lube.
Now, to replace your gear oil, just unplug the drain from the bottom and unplug the vent plug from the plate. You should consult the engine manual if you cannot locate either of these plugs. Next, you will need a hand pump to remove any air.
These are cheap and can be found at any marine parts supplier. Take the pump and do a few preliminary pumps, then start pumping in your gear oil. Continue pumping until it starts to come out from the vent plug.
Plug the vent back up, then remove the hand pump and replace the drain plug.
Don’t Forget to Grease
After you finish replacing your oils, don’t forget to give your outboard motor the ol‘ grease job. Buy some marine grease and a nice grease gun. This is important stuff because it keeps your motor balanced and easy to maneuver.
You’ll want to pump grease into all the zerk fittings around your motor’s pivot, steering, and tilting mechanisms. Consult your manual to ensure you don’t leave out any spots.
Replacing the Fuel Filters
Ideally, your fuel filters should be replaced twice as often as your oil changes. This might vary based on make, model, and year of your motor. Of course, there’s no such thing as being too cautious when it comes to your fuel filter.
These small filters keep any water or dirt from getting inside your outboard motor, reducing its lifespan from gradual damage. The worst case scenario is having such a buildup of dirt in the motor where it constantly overheats or breaks a seal. These filters can be found in most marine parts stores.
Maintaining the Propeller
Inspecting and servicing your propeller should happen after every start. The first thing you should do after shutting it off is taking your hand and spinning the propeller to listen for any debris or fishing line stuck on it. It doesn’t matter how far off the shore you went fishing; it is worth the time to take a look.
If the fishing line is braided, rather than a monofilament, you won’t hear it, so you’ll need to remove the propeller to check it out. You don’t need to do this on every outing, but it’s not a bad idea to inspect it when you’re going to do oil changes. While you’re at it, you can take this opportunity to re-lube the propeller shaft and associated fixtures.
Zinc Replacement
Periodically inspect the sacrificial zinc anodes on your outboard. These intentionally corrode before your outboard does to protect the motor. Replace them when they are 50 percent gone.
Spark-Plugs and Zinc Anodes
These next maintenance items will only need servicing every other oil change, generally. Zinc anodes are easy to check for, you’ll notice them start to corrode over time. Once they get to be about halfway gone, you’ll want to replace them.
Spark plugs can be a little tricky to replace if you’ve never done it before on a boat. Unlike a standard motor, outboard motors will have spark plugs installed far into the cylinder head. Each spark plug has its own coil bolted on top of it.
The first step to accessing the spark plugs is to undo the coil and remove the boot from the top. Next, you’ll need a long wrench, one that can reach the screws in between the gaps, and unscrew the spark plug. After you’ve got it out, take the fresh spark plug and thread it in exactly how the old one was in tightly.
Be careful not to put too much force in securing the spark plug; the threads can strip easily. Place the boot back and bolt down the coil and you’re finished. You should avoid trying to save time by unplugging them at the same time and replacing them because reattaching the wires all at once gets confusing.
Make sure you purchase the exact same types of plugs, or you’ll be killing yourself trying to get the wrong sized gaps to fit.
Anti-Corrosion and Anti-Freeze
There are a couple optional, but highly useful, maintenance fluids that you can add to your outboard motor checkup. You can buy an anti-corrosive spray to protect your powerhead from water that sprays under the hood. This is a common site among older boats because it’s usually not enough for most owners to be bothered with.
Another underrated and useful way you can protect your motor is using anti-freeze to winterize it if you live up north. It’s not a completely straightforward process, but it is well worth the effort if you often boat in below-freezing temps.
Outboard Motor Services
We know we covered a lot of maintenance required to keep your motor safe from any unneeded boat repairs. It’s okay to feel bogged down sometimes. The average Joe might feel in over his head, which, again, is nothing to be ashamed of. Most of us want to take our boat out to fish and just keep her clean and fueled up.
For everything else, you have certified boat technicians who can make sure everything is running smoothly. Some things just shouldn’t be handled by an amateur anyway. I mean, you could perform major surgery on yourself with the aid of the internet, but that doesn’t mean you should.
Take care of your boat on dry land and your boat will always take care of you on the open waters. You can learn more by visiting our blog or feel free to contact us if you any question.